
Did you know that there are excellent all-rounder apps, online tools, and keyboard shortcuts to take a screenshot (screen capture) and annotate it? Whether you say yes or no, It doesn’t matter, though. You will learn many methods that you did not know.
That’s why you are reading this article—because you don’t know everything. Not only that, but also the luckiest of you! In this article, you will learn six methods for capturing the screen and annotating the image.
Table of Contents
1. Capture Screen and annotate using FastStone
The only all-around screen capture and annotation app is FastStone. I used almost all the apps. But I can’t find a better app than this. So if you use this fantastic annotation app, don’t use it at all. It is available for both Mac and Windows versions.
After installing and activating the FastStone app, do the following:
- Launch the window or app that you want to capture a screen shot in.
- Press “Shift + Prt sc” on the keyboard for screen capture options
FastStone Annotation Tools Shortcuts
| Keyboard Shortcut (Keyword) | Description |
|---|---|
| F1 (Arrow key) | F1 is used to select any object you want by clicking |
| F2 (Select Canvas) | Select any portion of the screenshot to crop, move, copy, paste, blur, or spotlight. |
| F3 (Rectangular Text Box) | The rectangular text box is used to type something you want to describe any portion of the screen capture |
| Ctrl + F3 (Oval Text Box) | Oval Text Box is used to type something you want to describe any portion of the screen capture |
| F4 (Text) | Type text on the capture |
| F5 (Steps) | Click to start the steps with the customized numbers |
| F6 (Line) | Draw arrow line |
| Ctrl + F6 | Draw a fancy line |
| F7 (Pencil) | Draw something you want |
| Ctrl + F7 (Eraser) | Erase anything from the screen capture |
| F8 (Line) | Draw vertical and/or horizontal line |
| Ctrl + F8 (Polyline) | Draw a polyline in any direction |
| F9 | Draw a rectangle |
| Ctrl + F9 | Draw a filled rectangle |
| F10 (Oval) | Draw an oval |
| Ctrl + F10 | Draw a filled oval |
| F11 ( Line Highlighter) | Highlight the line you want |
| F12 (Highlight something you want) | Highlight something you want |
| Fill with colour | Fill the specific area with any colour you want |
| Blur | Unclear a specific part of the image to make it invisible |
| Bracket | Used to draw curly brackets or braces wherever you want on the image |
| Mouse Pointer | Insert customized mouse pointer |
| Insert Image | Insert the Image wherever you want and resize |
| Delete | Remove the selected object |
| Ctrl + Z (Undo) | Go one step backwards |
| Ctrl + Y (Redo) | Go one step forward after going some steps back |
| + (Zoom in) | Zoom in the image to 400% |
| – (Fit to Window) | Zoom out to 400% or Fit to Window |
| 1 (Actual Size) | Keep the image to the default size |
| Ctrl + P (Print) | Print your annotated image |
FastStone Editor:
1. File:
New (Ctrl + N):
Create a new image with different units such as Pixels, Inches, and Centimeters in different customized and preformatted sizes.
Steps to follow to create a new blank image:
- Click File
- Then click New, or Press Ctrl + N to launch a popup window
- On the popup window, select a unit name and preformatted size, or type height and width manually, and then choose the colour you want.
- Lastly, click OK
- You can also import clipboard images (previously cut or copied images were going to the clipboard)
Open (Ctrl + O):
Launches a dialogue box to open saved images on your computer.
Steps to follow to open an image from your computer disk:
- Click File and then click Open or press Ctrl + O
- Search for saved images on your computer, then double-click to inset.
Import From Clipboard (Just like a Paste):
You can also import an image that was saved into the clipboard by cutting or copying. The imported image was created as a new tab, not pasted on the current image. The keyboard shortcut is Alt + V
Steps to follow to Import images from Clipboard:
- Cut or Copy any image or crop an image and cut or copy the cropped area to send it to the clipboard
- Then click Import from Clipboard or press Alt + V to create a new image.
Save (Ctrl + S):
- Save the image changes at the current location.
Save Selection (Shift + S):
- Save the selected part of an image.
Save All (Ctrl + Shift + S):
- Save all the images on all the tabs.
Recent Files:
- Opens recent image in a recent image files list. To open all recent files, press Alt + A. To open the last recent file, press Alt + 1, for the last but one file, press Alt + 2, etc.
Open File Location:
- The open file location of a current image
Email (Ctrl + M):
- Send the current image by using the email.
Print (Ctrl + P):
- Print the current image
Send to New Tab (Alt + C):
- Send the image to the new tab by keeping the existing one.
Send to OneNote (Alt + O):
- Sends the current image to OneNote to launch it immediately for working in OneNote.
Send to Word (Alt + W):
- Sends the current image to Word to launch it immediately for working in Word.
Send to Excel (Alt + E):
- Sends the current image to Excel to launch it immediately for working in Excel.
Send to PowerPoint (Alt + P):
- Sends the current image to PowerPoint to launch it immediately for working in PowerPoint.
Send to Web (FTP) (Alt + T):
- Sends the current image to the website using the FTP (File Transfer Protocol) to publish it whenever you want.
Close (Alt + X):
- Closes the FastStone Editor app completely.
2. Screen “Capture” Options with Keyboard Shortcuts
Open File in Editor:
By using this option, you can create a new file or open the saved one. You can use Tab only after capturing something you want.
Keyboard shortcuts:
New: Creates a new blank file in editor (Ctrl + N)
Open: Opens a saved file location in your computer to open the file (Ctrl + O)
Import from clipboard (Alt + V): Open the file that was stored in the clipboard (After cutting or copying the file)
Show Editor: Open a FastStone editor window (Ctrl + E)
Open Last File Location: Opens the latest created file (W), You can also use keyboard shortcuts from Alt + 1 to Alt +9 to open images that have been created recently
Capture Active Window (Alt + Prt Sc):
- Used to capture the currently active window.
Capture Window/Object (Shift + Prt Sc)
Used to capture any window by hovering over and clicking the window you want
Capture Rectangle Region (Shift + Prt Sc)
When you use this option or keyboard shortcut, the mouse pointer will be turned into horizontal and vertical lines like an x and y axis.
At that time, hover the x and y axes over the capture rectangle region using the mouse
Then click and hold down on the top left corner of the rectangle region that you want to capture
And drag down towards the bottom right corner of the rectangle region, and then release the mouse button to take a screenshot.
Capture Freehand Region (Ctrl + Shift + Prt Sc):
Capture any region of the window you want to capture by clicking and selecting the region with the mouse pointer.
Capture Full Screen:
Use this option to take a full-screen capture.
Capture Scrolling Window (Ctrl + Alt+ Prt Sc)
This is very useful for capturing an invisible, long window region that is taller than the computer screen.
To do so, Use this option or press Ctrl + Alt + Prt Sc and do one of the following:
Autoscroll Mode: → Hover over the screen to confirm the region, then press the left mouse button. Wait until the entire screen is scrolled and captured.
Custom Scroll Mode: → Hold down the Control key → Select the top left corner of the area that scrolls vertically. Click the down arrow on the scroll bar. Wait until the entire screen is scrolled and captured.
Capture Fixed Size Region (Ctrl + Alt+ Shift + Prt Sc)
Select this option or press Ctrl + Alt+ Shift + Prt Sc → Then right-click → Select the size that fits properly → Hover over the area you want to take a screenshot of and click there.
Screen Recorder
This app also includes a screen recorder option. Using this, you can record screens in whatever sizes you want.
Delay before capture
You can delay capturing the area by setting a time limit.
Set the output destination
Setting the output destination is one of the best options in FastStone capture. You can set the output destination to Editor, Draw, Clipboard, File, Auto Save, Printer, OneNote, Word, Excel, PPT, Include mouse pointer, Copy to clipboard, Auto Caption, Auto Edge, or Watermark.
Settings (F12)
- Convert annotated capture to a PDF file using Office applications
- Send the image to email and web using the FTP account
- Capture a different-Sized Window.
- Edith with external sources
- Adjust image colour to suit your specific needs.
- Add a watermark to the image to protect online and offline
- Apply effects to the screen you want
- Combine all images into one
- Change the Annotation settings you want
- Cut, copy, and paste the specific area of the screen capture
- Add a caption to the next use
- Add different Text Boxes wherever it is necessary
- Type text in any size of the image
- Add auto-serialized, numbered steps to describe and get your image to the next level
- Add arrows for directions in the image with different formatting
- Write something and feel like a real pencil
- Erase something that you don’t want
- Draw 360-degree straight or curved lines
- Draw filled and empty rectangles and ovals.
- Highlight something that you want to focus on in a specific part of the image
- Fill, burr, or highlight the specific part of the picture with colour
- Use brackets to express additional information
- Insert mouse different pointers and icons
- Insert the image from your computer disk
- Expand the canvas. expand it to the new size
- Delete the object that you have recently added to the image
- Undo, and redo the steps that you have done earlier
- Zoom out or in the captured screen
- Finally, you can also print the captured and annotated image.
You can read Work Faster with Essential Snipping Tool Shortcuts – Windows
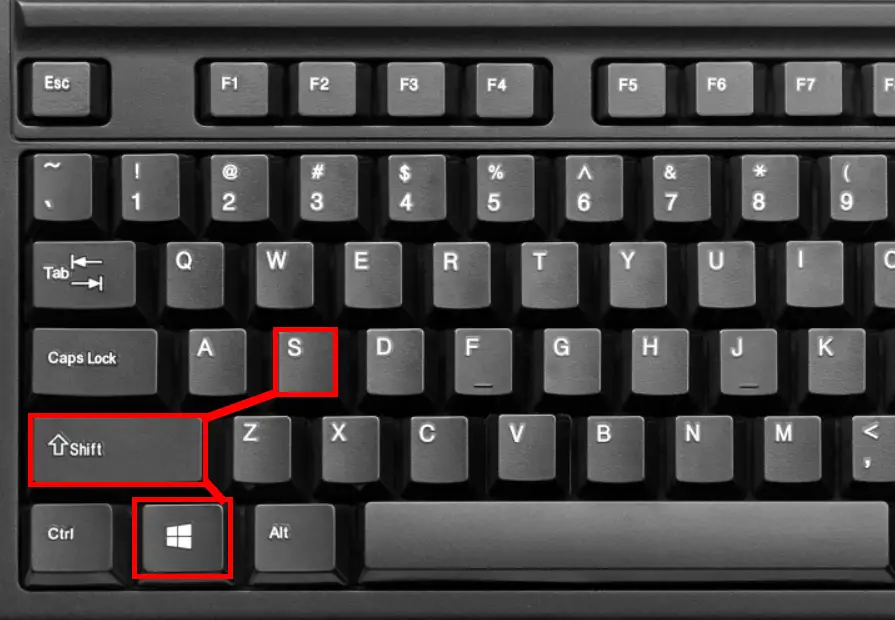
1. How to Take a Screenshot Using Window Key
Open the file or window that you want to take a snapshot of.
To create a screenshot as a part of the screen (a portion of the screen), press Window+Shift+S at a time, and then automatically the screen will be selected.
Now, press and hold down the left mouse button and drag over the screen that you want to take a portion of.
Then immediately, an image popup will open at the bottom right corner of the screen
Click the popup to open the picture and save it.
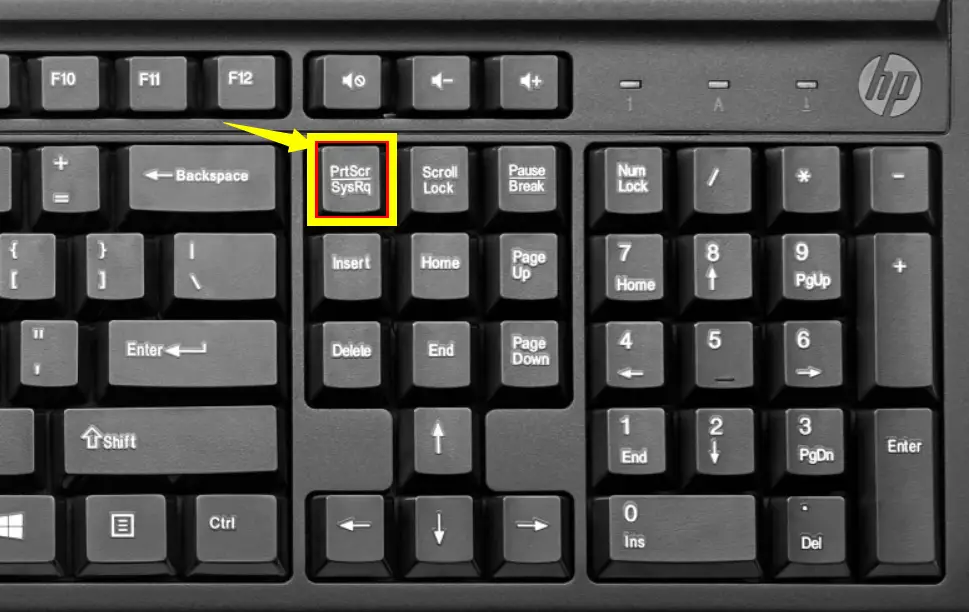
2. How to Print Screen an Entire Window Using Keyboard
To take a snapshot of an entire screen, simply press the “Prt Sc” or “Print Screen” keys,
Then open one of the applications, such as Paint, MS Word, etc.
Now, click on “Paste” in the Clipboard group.
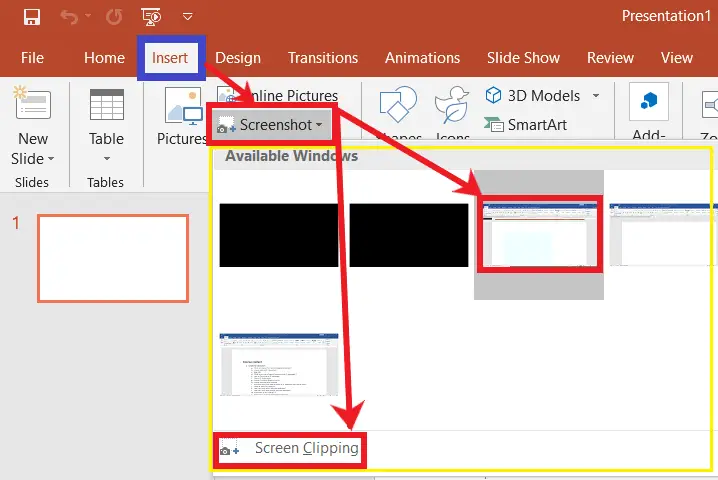
3. Screenshot Using MS Office Applications
Follow the steps below to take a screenshot using MS-Office Applications :
Open one of the MS Office applications, such as Word, Excel, or PowerPoint (2019 and 2016 versions only).
Then go to the Insert tab
Then click on “Screenshot” to expand the drop-down options
To take a screenshot of an entire screen, simply click on the picture icon under “Available windows”, and an automatic snapshot picture is automatically inserted into the document.
Or otherwise, click on “Screen clipping” to select an entire screen behind the Word, Excel, or PowerPoint application.
Now, to take a part of the screen wherever you want, keep holding down the left mouse button and dragging over the part you want.
Then automatically, an image will be inserted into the document.
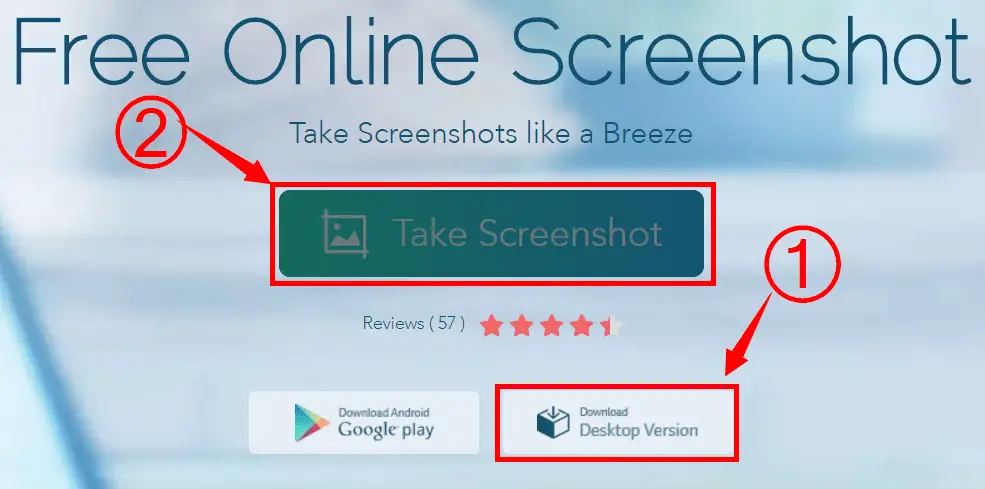
4. Take an online screenshot.
Follow the steps below to take an online screenshot:
Go to screenshot.net
Then click on “Take a Screenshot” or “Download Desktop Version.”
After downloading the software, install it.
Make sure to go to screenshot.net and click on “Take a Screenshot”
Then immediately, a dialogue box of the software will open
Now, open the window or screen that you want to take a screenshot of, and then press Ctrl+D.
After pressing Ctrl+D, the entire screen will be selected.
Now, to take a portion of the screen wherever you want, keep holding down the left mouse button and dragging over the part you want.
There are some options available to apply direction, circle, and number to the snapshot.
5. Print Screen Software for both Win and Mac
A “light shot” snapshot is a piece of software that is available for both Windows and Mac.

Video Tutorial
What is the Windows Shortcut key to make a Screenshot?
Press Window+Shift+S or the PrintScreen key on the Keyboard, then paste anywhere you want.
How to Include a Mouse Pointer in Screen Capture
On the FastStone Toolbar, click Output, then select “Include mouse pointer” under the options.
What is a FastStone?
FastStone is the best screen capture and annotation app. It is used to capture screens in different ways. After taking a screen capture, there are many annotation options that you can use to describe the image.
How can I take a screenshot and annotate it in Windows?
You can use the “Snipping Tool” or “Snip & Sketch” to capture screenshots and then use the built-in annotation tools for marking.
What’s the quickest way to take a screenshot and annotate it on a Mac?
Press “Shift-Command-4” to capture, then click and drag to select the area. Afterward, a preview of the screenshot will allow you to annotate it.