Any existing word document can be easily scaled to the legal paper size or any other size.
The standard size for writing legal documents is 8.5″ x 14″. Legal paper comes in both letter and legal sizes, although the former is more common than the latter.
The legal paper has a margin on all sides, which makes it ideal for printing multiple pages on one sheet of paper. To scale a document to legal paper size, follow this post in its entirety.
In this article, you are going to learn how to scale a document to Legal Paper Size (8.5×14) in Microsoft Word.
Table of Contents
What is a Legal Document?
Legal documents are a piece of recorded evidence based on the defined laws of the constitution with the trust and mutual acceptance of two or more parties.
These are based on the rules, regulations, and guidelines of the government. The legal documents include Will, Contract, Deed, Partnership Agreements, Trust, etc.
Video Tutorial
Scale a document to legal paper size
Before making any changes, verify the current paper size of your document. By default, Microsoft Word generally uses standard letter size (8.5×11 inches).
- First, open your document in Microsoft Office 365 or MS Office 2019.
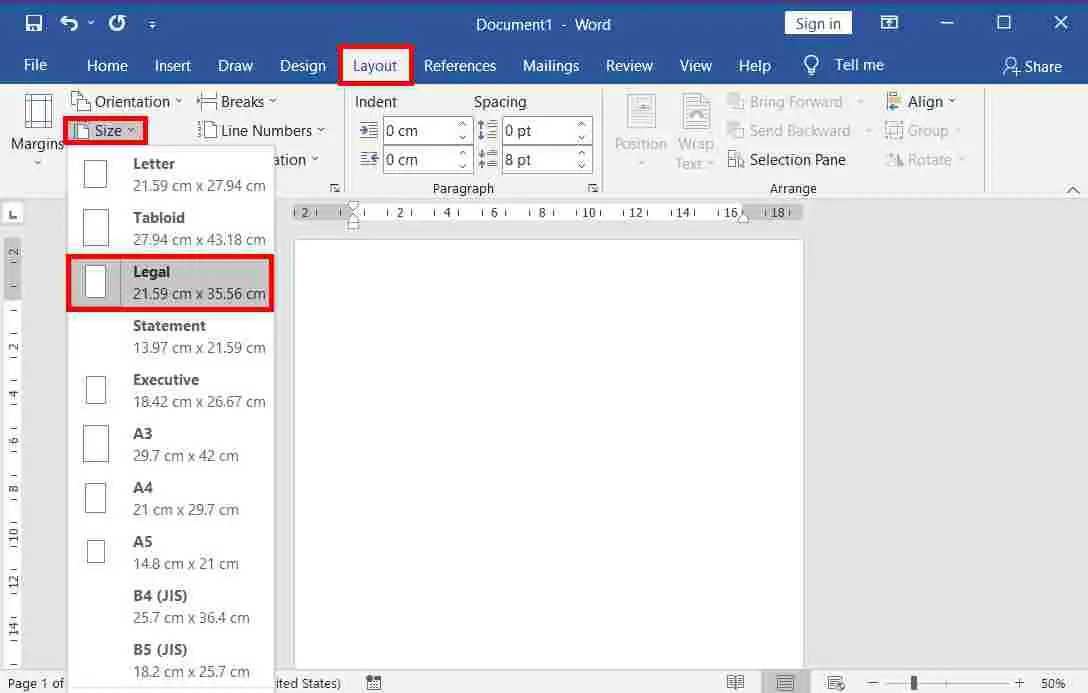
- Navigate to the “Layout” tab located in the toolbar.
- Within the “Layout” tab, look for the “Page Setup” group.
- Click on the “Size” option in the “Page Setup” group. This will open a drop-down menu.
- From the drop-down menu, select “Legal” which has the dimensions 8.5 x 14 inches (21.59 cm x 35.56 cm).
- Once you select the “Legal” size, your document will automatically be converted into a legal-sized document.
By following these steps, you have successfully changed the paper size of your document to legal size.
After changing the document to a legal paper size, you may notice that your existing content may not fit with these changes.
In this situation, you may need to adjust the margins accordingly to accommodate the new size. You can change this on the same tab in the same group of MS Word using the margins options.
Change the default document size to another
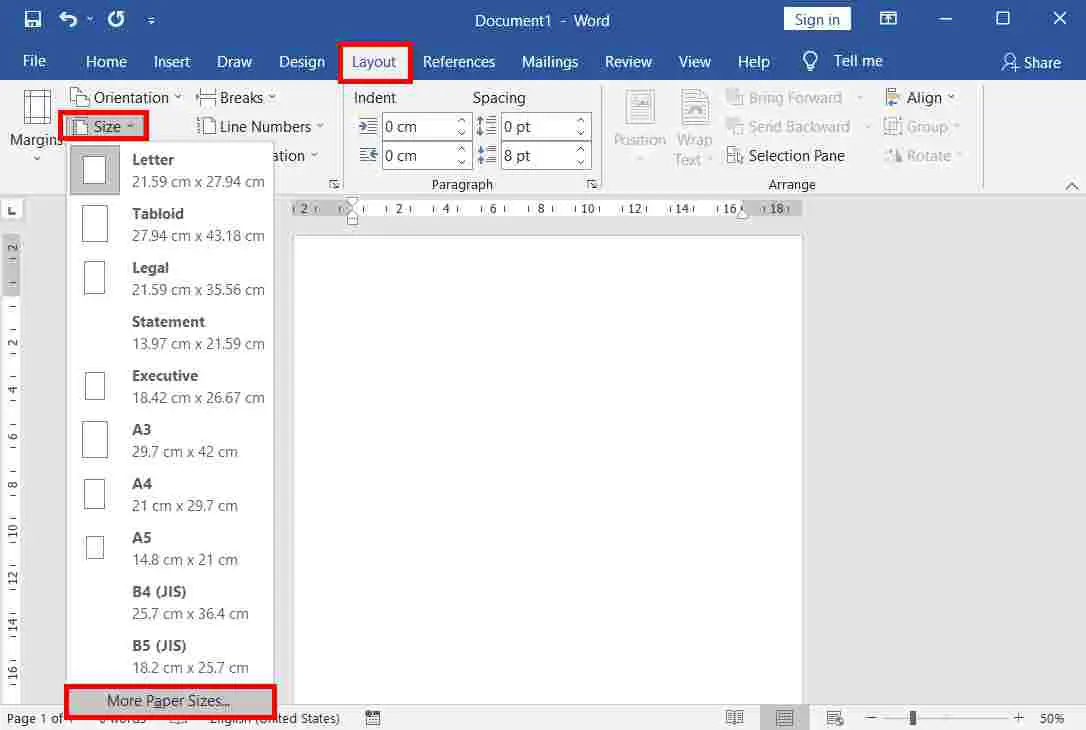
After navigating to the Layout tab, click “More Paper Size” to open a “Page Setup” dialogue box.
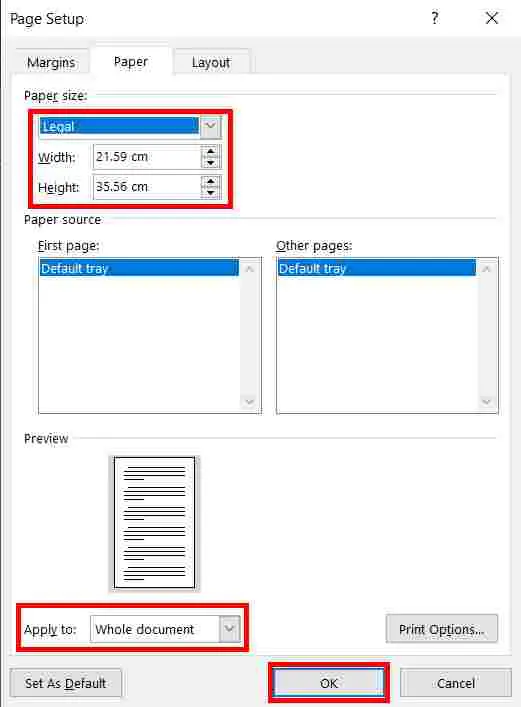
- Open the “Page Setup” dialogue box.
- In the dialogue box, select the desired paper size and then change the width and height of the document accordingly.
- To apply the size changes to the entire document, choose “Whole document” in the dialogue box, under preview, next to “Apply to.”
- If you wish to print the document at a scaled size, select “This print Forward” in the dialogue box, under preview, next to “Apply to.”
- Finally, click on the “OK” button to confirm and save the changes.
Additional Tips for Document Scaling
- Use Page Breaks: Utilize page breaks whenever necessary to transition to a legal paper size, ensuring seamless pagination across multiple pages. Make grammatical adjustments accordingly.
- Utilize Headers and Footers: Take advantage of headers and footers to enhance user experience by incorporating page numbers, document titles, and other pertinent details, providing additional comfort and convenience.
- Proofread Your Document: Before finalizing your scaled document, it is crucial to conduct proofreading diligently to catch any grammatical and spelling errors. a well written crafted document reflects great attention to detail and professionalism.
- Save in PDF Format: To ensure that your document appears the same across different devices and platforms, consider saving it in PDF format after scaling. PDF files retain formatting, preventing unintended alterations during transmission.
- Ensure Consistency: If you’re working on various word or other documents with similar content fromatting, such as text and graphics, maintain consistency in formatting, font styles, and layout across all documents.
How to Print Legal Paper Size?
You can set the paper to legal size before launching the print dialogue box, as explained above. Alternatively, you can set the paper size after launching the print dialogue box by following these steps:
- Press Ctrl + P or go to the File menu and click Print.
- Set the number of copies you want to print.
- Scroll down the print options and select Legal if you haven’t chosen this option before.
- Lastly, click “Print.”
Conclusion:
In conclusion, scaling any document to any size such as legal in Word makes a professional presentation. Follow the step-by-step guide for effortless resizing, enhancing your document’s appearance and accessibility.
What is a Legal Document?
Legal documents are a piece of recorded evidence based on the defined laws of the constitution with the trust and mutual acceptance of two or more parties.
What is the size of a Legal Paper?
The size of a legal paper is 21.59 cm x 35.56 cm.
How do I scale a document to legal paper size in Microsoft Word?
To scale a document to legal paper size in Microsoft Word, go to the “Page Layout” tab, select “Size,” and choose “Legal (8.5 x 14 inches)” from the options.
Can I scale a document to legal paper size in Adobe Acrobat?
Yes, in Adobe Acrobat, you can scale a document to legal paper size by going to “File,” selecting “Print,” and then choosing “Legal” as the paper size in the print settings.
What is the primary advantage of using legal paper size for documents?
The primary advantage of using legal paper size is that it provides more space for content, making it suitable for legal documents, contracts, and reports with extensive text.