Go To command is one of the best ways to move forward or backward relative to the location of a page, paragraph, line, section, bookmark, footnote, endnote, field, table, graphic, equation, etc.
(To go to a specific location in a word document and the number of items, you can move forward or backwards depending on the number you choose).
Table of Contents
How to use any Go To Command in MS-Word
On the Home tab, in the Editing group, click on Replace to open a dialogue box. After clicking on the Replace, select the “Go To” command on the dialogue box.
On the left of the “Go To” dialogue box, (under “Go to what:”) select one of the options you want. For example, select “Page”. As soon as you select the option like a page, on the right side, the heading of the box and its options will be changed.
Since you have already selected the option “Page”, in the box on the right side, if you want to move forward with the number of items, enter the number followed by the + (plus) sign. Similarly, if you want to move back the number of items, enter the number followed by the – (minus) sign. To gain complete knowledge, read a list of all options that are given below the shortcut key.
Shortcut Key
The shortcut key to open a “Go To” dialogue box in MS Word is “CTRL+G“.
List of Options
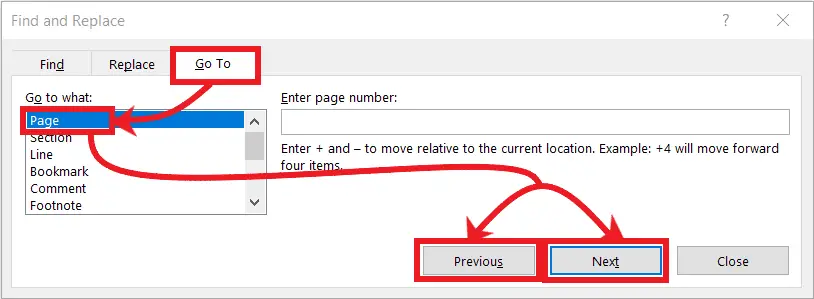
1. How to Go To “Page ” in Word
It is difficult to jump from one page to another in any document that has more pages. So, the page option in Go To is very useful for you to jump from one page to another.

After opening the GO To dialogue box, follow the steps below.
Since the page option is selected by default, if you want to jump to the next page, click on Next to the box on the right side. The more times you click, the more you can move forward.
Click on the Previous button to navigate to the previous page. Click as many times as you want to go to the back pages.
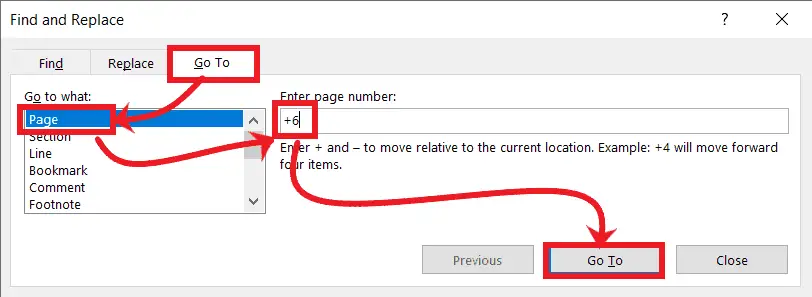
To navigate to any Next page you need in the document, you have to type + (plus) followed by the page number in the search box (for example +6) as in the picture below and click on Go To or press the Enter key.
In the same way, to navigate to the Previous page you need in the document, you have to type the – (minus) sign followed by the page number in the search box (for example -3) as in the picture below and click on “Go To” or press the Enter key.
2. How to Go To “Section” In Word
On a page, be sure to include some paragraph content.
Click on the beginning of the 2nd paragraph of the page (no need for the 1st paragraph), which has more.
Go to the “Layout” tab > Click on the “Breaks” in the “Page Setup” group > Click “Continues” under “Section Breaks”.
Apply the section break to all the paragraphs as described in the step above.
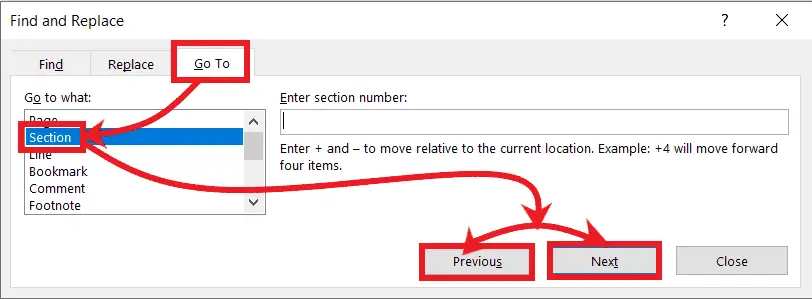
Now, after opening the GO To dialogue box, select the “Section” option under the “Go to what:” list by using the scrollbar or drop-down arrow.
If you want to jump to different sections on the same page, you have to apply the section break. For example: On a page with six paragraphs, if we want to navigate to the paragraph we like, insert the section break as explained below.
Then to jump to the next “Section”, click on “Next” Located at the bottom right of the search box. The more times you click, the more you can move forward.
To jump to the previous “Section”, click on “Previous” Located at the bottom right of the search box. The more times you click, the more you can move backwards.
To navigate to any next section in the document, you have to type the + (plus) sign followed by the section number in the search box (for example type +6) as in the picture below and click on “Go To” or press the “Enter” key.
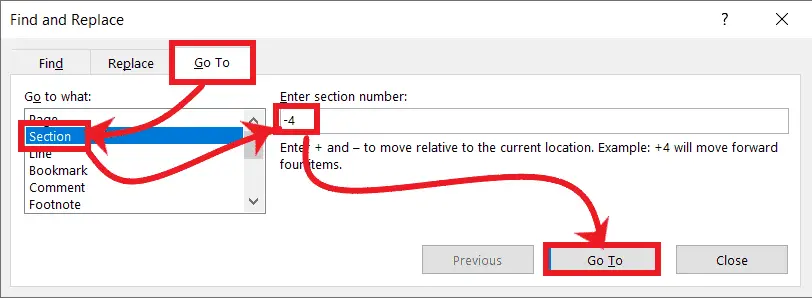
In the same way, to navigate to any previous line in the document, you have to type the – (minus) sign followed by the page number in the search box (for example type -4) as in the picture below and click on “Go To” or press the “Enter” key.
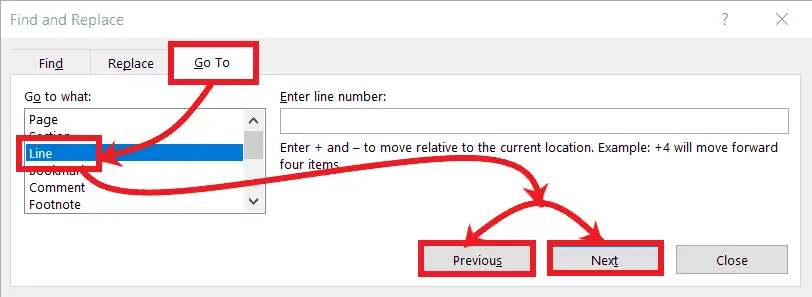
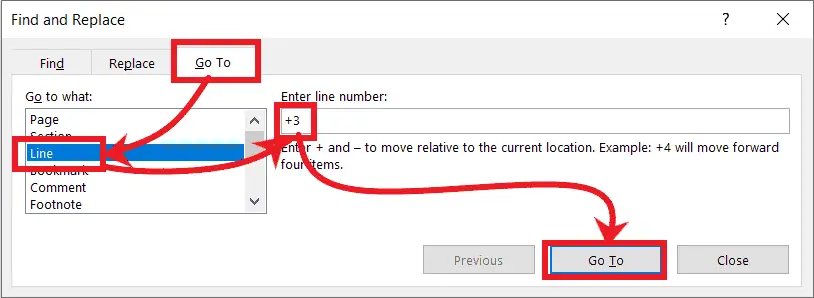
3. How to Go To “Line” in Word Document
On some pages in a word document, be sure to include some content.
On the GO To dialogue box, select the “Line” option under the “Go to what:” list by using the scrollbar or drop-down arrow.
To move to the next “Line”, click on “Next” Located at the bottom right of the search box. The more times you click, the more you can move forward.
To move to the previous “Line”, click on “Previous” Located on the bottom right of the search box. The more times you click, the more you can move backwards.
To navigate to any next line in the document, you have to type the + (plus) sign followed by the line number in the search box (for example type +6) as in the picture below and click on “Go To” or press the “Enter” key.
In the same way, to navigate to any previous line in the document, you have to type the – (minus) sign followed by the line number in the search box (for example type -5) as in the picture below and click on “Go To” or press the “Enter” key.
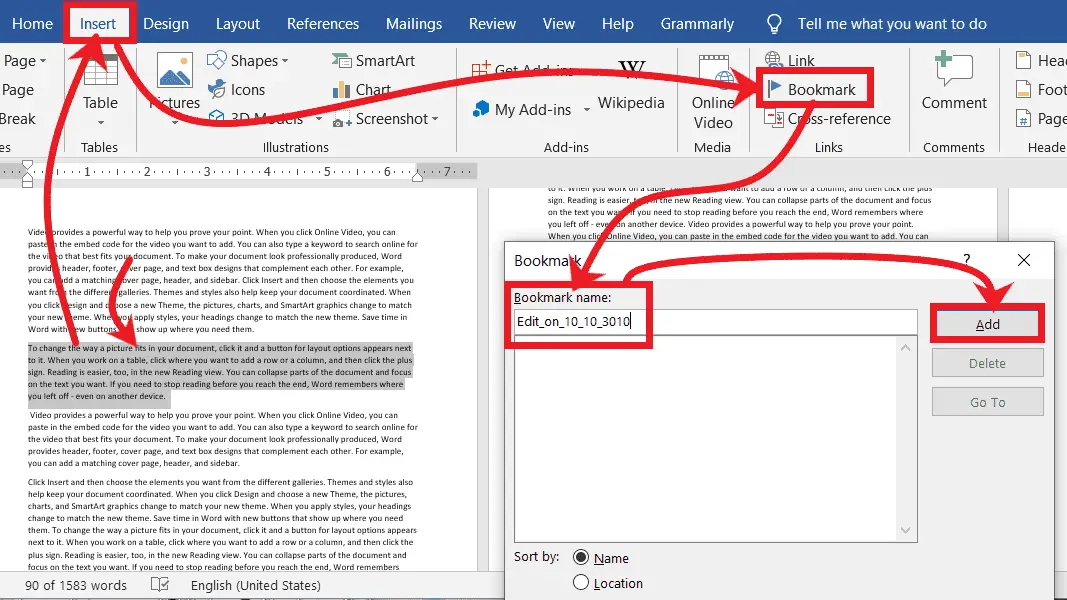
4. How to Go To “Bookmark” in Word Document
On some pages in a word document, be sure to include some content.
Now select the text you want on any page.
On the “Insert” tab, in the “Links” group, click on “Bookmark” to open its dialogue box.
Bookmark as many as you want as described above.
After opening the “Go To” dialogue box, select the “Bookmark” option under the “Go to what:” list by using the scrollbar or drop-down arrow.
To move to the next, click on “Next” Located at the bottom right of the search box. The more times you click, the more you can move forward.
To move to the previous, click on “Previous” Located at the bottom right of the search box. The more times you click, the more you can move backwards.
To navigate to any next Bookmark in the document, you have to type the + (plus) sign followed by its number in the search box (for example type +6) as in the picture below and click on “Go To” or press the “Enter” key.
In the same way, to navigate to any previous Bookmark in the document, you have to type the – (minus) sign followed by the itsnumber in the search box (for example type -5) as in the picture below and click on “Go To” or press the “Enter” key.
5. How to Go To “Comment” in Word Document

On some pages in a word document, be sure to include some content.
Then select the text you want to comment on any page.
On the “Review” tab, in the “Comments” group, click on “New Comment” (the comment box opens on the right of the document as in the picture below).
Comment on the text as much as you want as described above.
After opening the “Go To” dialogue box, select the “Comment” option under the “Go to what:” list by using the scrollbar or drop-down arrow.
To move to the next “Comment”, click on “Next” Located at the bottom right of the search box. The more times you click, the more you can move forward.
To move to the previous “Comment”, click on “Previous” Located on the bottom right of the search box. The more times you click, the more you can move backwards.
To navigate to any next Comment in the document, you have to type the + (plus) sign followed by the Comment number in the search box (for example type +3) as in the picture below and click on “Go To” or press the “Enter” key.
In the same way, to navigate to any previous Comment in the document, you have to type the – (minus) sign followed by the Comment number in the search box (for example type -4) as in the picture below and click on “Go To” or press the “Enter” key.
6. How to Go To “Footnote” in Word Document

On some pages in a word document, be sure to include some content.
Then select the text or click on the right side of the text you want to insert the Footnote
On the “References” tab, in the “Footnotes” group, click on “Insert Footnote”.
Insert Footnote as many times as you want as described above.
Footnotes appear at the bottom of the concern page and a number matches up with a reference to the footnote as a superscript on the page. (click here to read the full article on Footnote for a clear idea >>).
Now open the “Go To” dialogue box, then select the “Footnote” option under the “Go to what:” list by using the scrollbar or drop-down arrow.
To move to the next “Footnote”, click on “Next” Located at the bottom right of the search box. The more times you click, the more you can move forward.
To move to the previous “Footnote”, click on “Previous” Located at the bottom right of the search box. The more times you click, the more you can move backwards.
To navigate to any next Footnote in the document, you have to type the + (plus) sign followed by the Footnote number in the search box (for example type +3) as in the picture below and click on “Go To” or press the “Enter” key.
In the same way, to navigate to any previous Endnote in the document, you have to type the – (minus) sign followed by the Footnote number in the search box (for example type -4) as in the picture below and click on “Go To” or press the “Enter” key.
7. How to Go To “Endnote” in Word Document
On some pages in a word document, be sure to include some content.
Then select the text or click on the right side of the text you want to insert the Endnote
On the “References” tab, in the “Footnotes” group, click on “Insert Endnote”.
Insert Endnote as many times as you want as described above.
Endnotes appear at the bottom of the concern page and a number matches up with a reference of the footnote as a superscript on the page. (click here to read the full article on Endnote for a clear idea).
Now open the “Go to” dialogue box, then select the “Endnote” option under the “Go to what:” list by using the scrollbar or drop-down arrow.
To move to the next “Endnote”, click on “Next” Located at the bottom right of the search box. The more times you click, the more you can move forward.
To move to the previous “Endnote”, click on “Previous” Located at the bottom right of the search box. The more times you click, the more you can move backwards.
To navigate to any next Endnote in the document, you have to type the + (plus) sign followed by the Endnote number in the search box (for example type +3) as in the picture below and click on “Go To” or press the “Enter” key.
In the same way, to navigate to any previous Endnote in the document, you have to type the – (minus) sign followed by the Endnote number in the search box (for example type -4) as in the picture below and click on “Go To” or press the “Enter” key.
8. How to Go To “Field” in Word Document
On some pages in a word document, be sure to include some content.
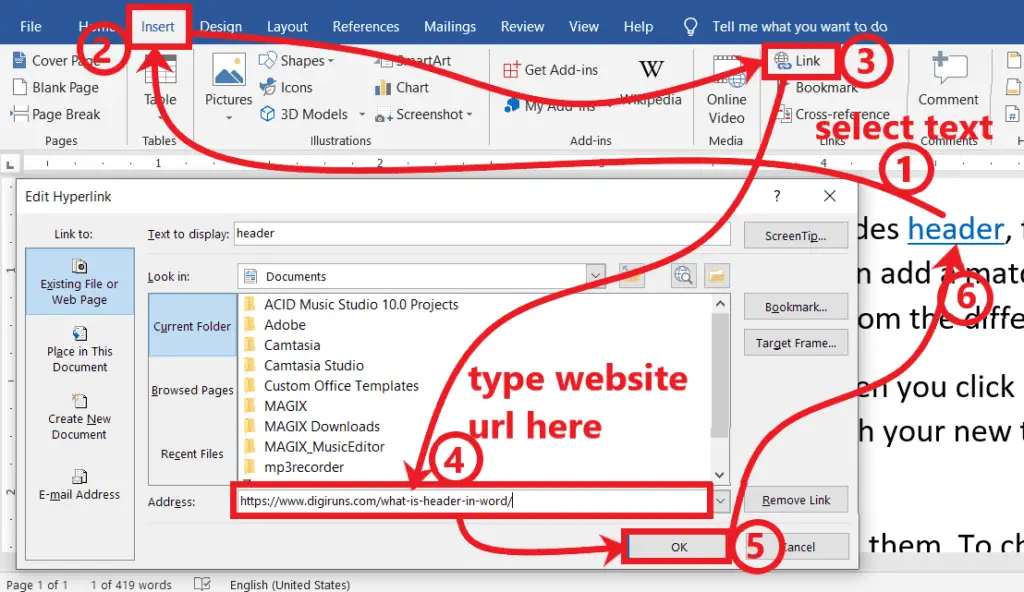
On the “Go To” dialogue box, In the Field options, you can select any field you want. In this option, I am going to choose “Hyperlink” after completing the following steps.
To insert “Hyperlink”, select the text you want.
Go to the “Insert” tab and click on the “Link” in the links group to open a dialogue box.
On the dialogue box, type the website address you know in the address box and click ok.
Then open the “Go To” dialogue box and select the “Filed” option under the “Go to what:” list by using the scrollbar or drop-down arrow.
To move to the next “Filed”, click on “Next” Located at the bottom right of the search box. The more times you click, the more you can move forward.
To move to the previous “Filed”, click on “Previous” Located at the bottom right of the search box. The more times you click, the more you can move backwards.
To navigate to any next Field in the document, you have to type the + (plus) sign followed by the Filed number in the search box (for example type +3) as in the picture below and click on “Go To” or press the “Enter” key.
In the same way, to navigate to any previous Filed in the document, you have to type the – (minus) sign followed by the Filed number in the search box (for example type -4) as in the picture below and click on “Go To” or press the “Enter” key.
9. How to Go To “Table” in MS Word
On some pages in a word document, be sure to insert some table along with the contents.
Then select the “Table” option under the “Go to what:” list by using the scrollbar or drop-down arrow.
To move to the next “Table”, click on “Next” Located at the bottom right of the search box. The more times you click, the more you can move forward.
To move to the previous “Table”, click on “Previous” Located at the bottom right of the search box. The more times you click, the more you can move backwards.
To navigate to any next Table in the document, you have to type the + (plus) sign followed by the Table number in the search box (for example type +3) as in the picture below and click on “Go To” or press the “Enter” key.
In the same way, to navigate to any previous Table in the document, you have to type the – (minus) sign followed by the Table number in the search box (for example type -4) as in the picture below and click on “Go To” or press the “Enter” key.
10. How to Go To “Graphic” in Word Document
On some pages in the word document, be sure to insert some graphics like shapes, pictures, Icons, 3D Models, and SmartArt Graphics
Then select the “Graphic” option under the “Go to what:” list by using the scrollbar or drop-down arrow.
To move to the next “Graphic”, click on “Next” Located at the bottom right of the search box. The more times you click, the more you can move forward.
To move to the previous “Graphic”, click on “Previous” Located at the bottom right of the search box. The more times you click, the more you can move backwards.
To navigate to any next Graphic in the document, you have to type the + (plus) sign followed by the Graphic number in the search box (for example type +3) as in the picture below and click on “Go To” or press the “Enter” key.
In the same way, to navigate to any previous Graphic in the document, you have to type the – (minus) sign followed by the Graphic number in the search box (for example type -4) as in the picture below and click on “Go To” or press the “Enter” key.
11. How to Go To “Equation” in Word Document
On some pages in the word document, be sure to insert some Equations
To insert equations in your document, go to the “Insert” tab and click on “Equation” in the symbols group.
Then select any equation to insert and edit it. (Insert as many equations as you want as explained in the step above).
Now select the “Equation” option under the “Go to what:” list by using the scrollbar or drop-down arrow.
To move to the next “Equation”, click on “Next” Located at the bottom right of the search box. The more times you click, the more you can move forward.
To move to the previous “Equation”, click on “Previous” Located at the bottom right of the search box. The more times you click, the more you can move backwards.
To navigate to any next Equation in the document, you have to type the + (plus) sign followed by the Equation number in the search box (for example type +3) as in the picture below and click on “Go To” or press the “Enter” key.
In the same way, to navigate to any previous Equation in the document, you have to type the – (minus) sign followed by the Equation number in the search box (for example type -4) as in the picture below and click on “Go To” or press the “Enter” key.
12. How to Go To “Object” in Word Document
On some pages in a word document, be sure to insert some Objects.
To insert any object, go to the “Insert” tab and click on the drop-down arrow of the “Object”. And select any object you want to edit and insert into the document.
On the “Go To” dialogue box, select the “Object” option under the “Go to what:” list by using the scrollbar or drop-down arrow.
To move to the next “Object”, click on “Next” Located at the bottom right of the search box. The more times you click, the more you can move forward.
To move to the previous “Object”, click on “Previous” Located at the bottom right of the search box. The more times you click, the more you can move backwards.
To navigate to any next Object in the document, you have to type the + (plus) sign followed by the Object number in the search box (for example type +3) as in the picture below and click on “Go To” or press the “Enter” key.
In the same way, to navigate to any previous Object in the document, you have to type the – (minus) sign followed by the Object number in the search box (for example type -4) as in the picture below and click on “Go To” or press the “Enter” key.
How to Use Go To Command in MS Word?
It is used to jump anywhere in a word document. This command is useful if you want to navigate from one page, section, line, object, graphic, hyperlink, etc, to another
How do I find and go to a specific word or phrase in my document?
Use “Go To,” select “Find what,” and enter the word or phrase. Click “Next” to locate and navigate to the instances.
What is the “Go To” feature in Microsoft Word?
The “Go To” feature in Microsoft Word allows you to quickly navigate to specific pages, sections, headings, or other elements within your document.
How do I access the “Go To” feature?
To access “Go To,” press Ctrl + G (or F5) or go to the “Edit” menu and select “Go To…”
Is it possible to use “Go To” for searching specific words or phrases?
Yes, you can search for words or phrases by selecting “Bookmark” or “Comment” in the “Go To” dialog and entering the keyword.
What are bookmarks, and how can I navigate to them using “Go To”?
Bookmarks are specific locations you can set in your document. To navigate to a bookmark using “Go To,” select “Bookmark” and pick the bookmark name.
How do I jump between footnotes or endnotes using “Go To”?
In the “Go To” dialog, choose “Footnote” or “Endnote” and enter the number of the footnote or endnote.