The Table of Content is the most important for every soft and hard copy material. It is based on the heading levels of the content in the document and can be added where necessary at any beginning of the same document.
Without the TOC, one cannot easily guess the inner appearance of any book, magazine, or other material. When it comes to soft copy, you can easily navigate any part of the content in your document.
In this article, you will learn how to create an Automatic, Manual, and Custom Table of Contents from scratch to end. So, get started now.
How to Create a Table of Contents in Word 21
Inserting an Automatic Table of Contents in Word (1 and 2):
An automatic table of contents in Word is the easiest method. To create this in your material, you need to format the heading levels of the contents of the document. You can easily create it by following these steps carefully.
Use the most useful tools to be proper, and beautiful, and to avoid any errors to create a Table of Contents. They are 1. Navigation Pane, 2. Heading Styles, 3. Paragraph Mark, and 4. Font formatting group.
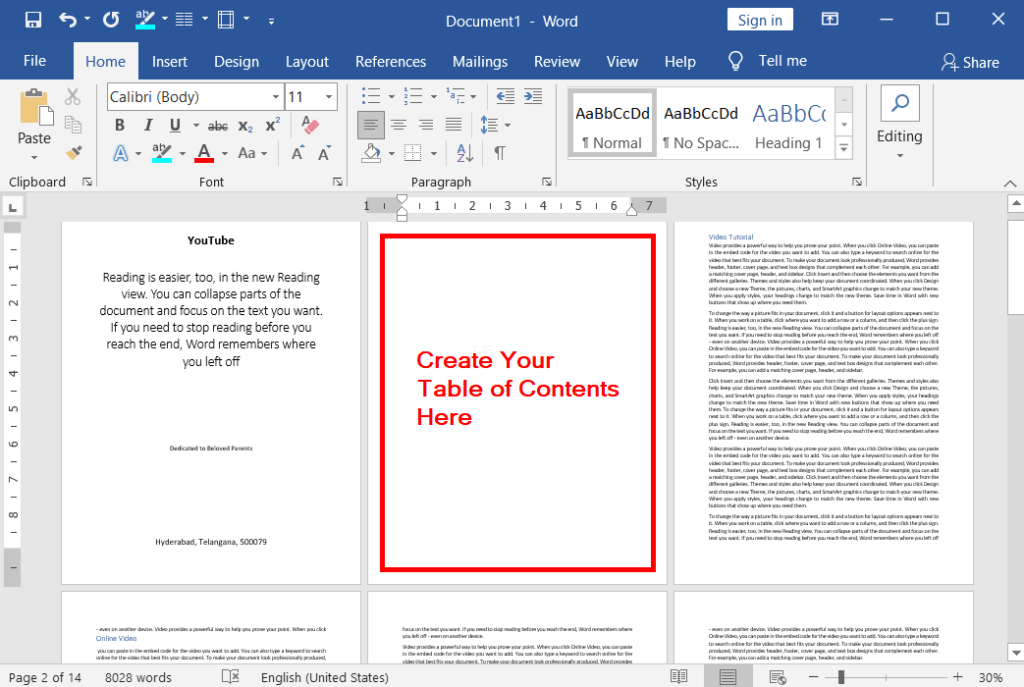
→ Open your pre-prepared word document, which may be a magazine, material, or any other book as in the picture below
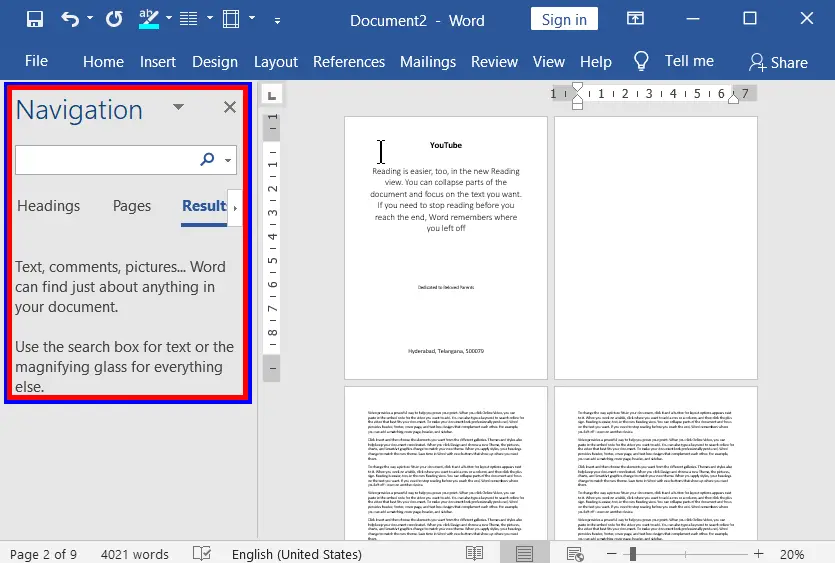
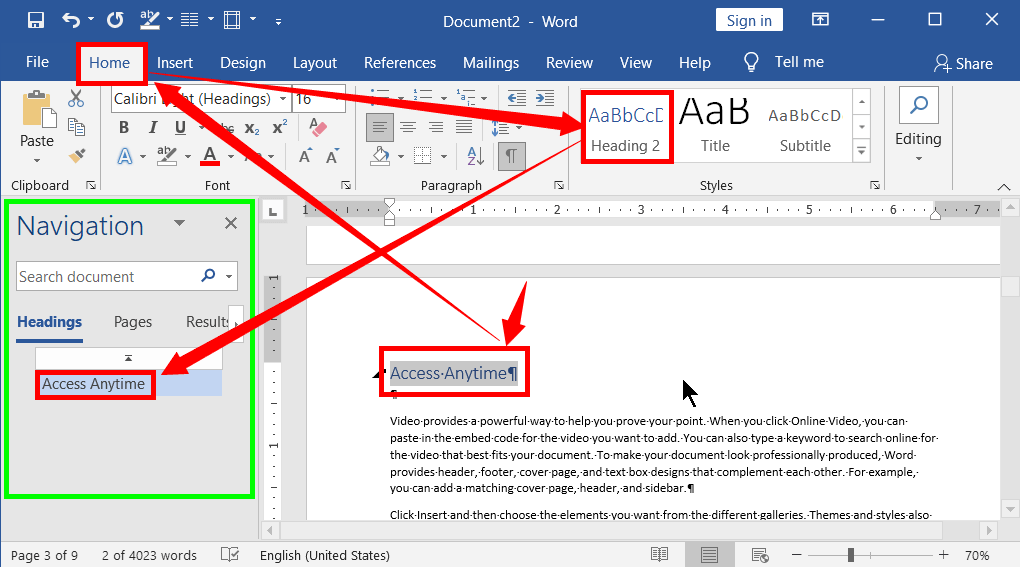
→ Launch Navigation Pane to see its pre-structure of it (To launch the navigation pane, Press CTRL + F, or go to the View tab, then checkmark the Navigation Pane box as in the picture below).
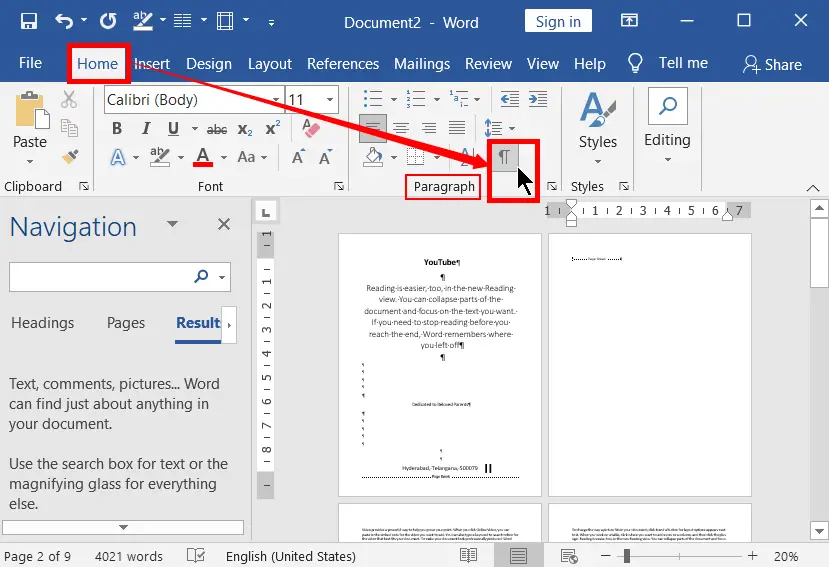
→ You may use the paragraph mark in the document. To do so, go to the Home tab, click on the Paragraph Mark icon in the Paragraph group or press CTRL + * (The paragraph mark is useful to show a point mark for each work in the document when you are creating it). Hide it whenever you want by using the same shortcut key.
→ In your word document, which may be any material, From the beginning of your content, select the first heading that you have prepared (Heading level 1)
→ On the Home tab, in the Styles group, click Heading 1 (Apply based on the heading level)
→ Now the formatted Heading Level 1 is to be shown in the Navigation Pane, which is at the right side of the document
→ Next, scroll down the document and select the next heading on the same or next page and click Heading 2 in the Styles group based on the heading level.
→ Again, the formatted Heading Level will be shown in the Navigation Pane, as well as you can see the difference between the Heading Level 1 and Heading Level 2
→ Similarly, format the heading levels as described above based on the heading level requirement of your document.
→ Put the cursor point by clicking in the beginning (pages 1,2,3 etc. based on requirement) of your document where itis required.
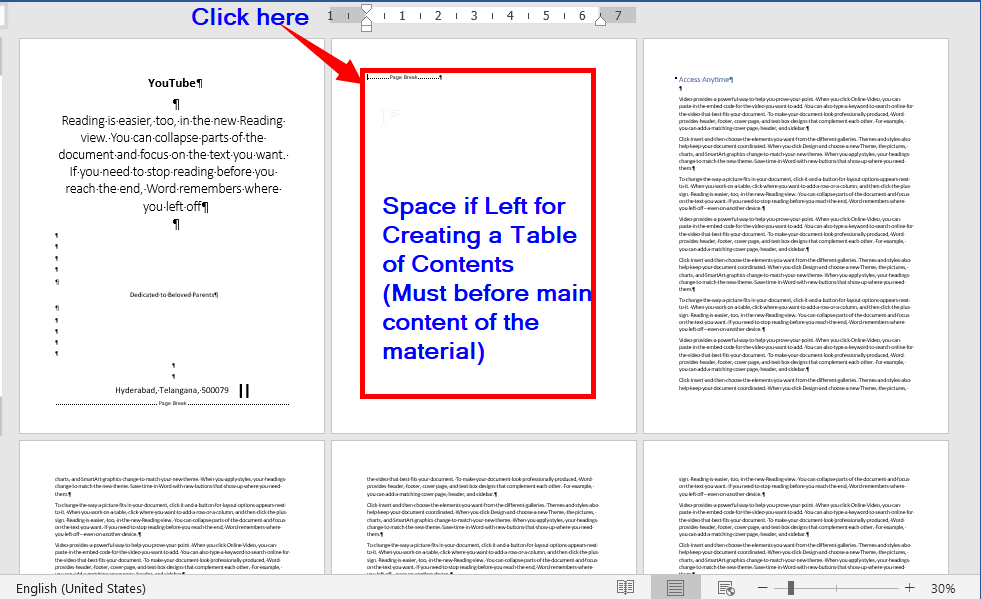
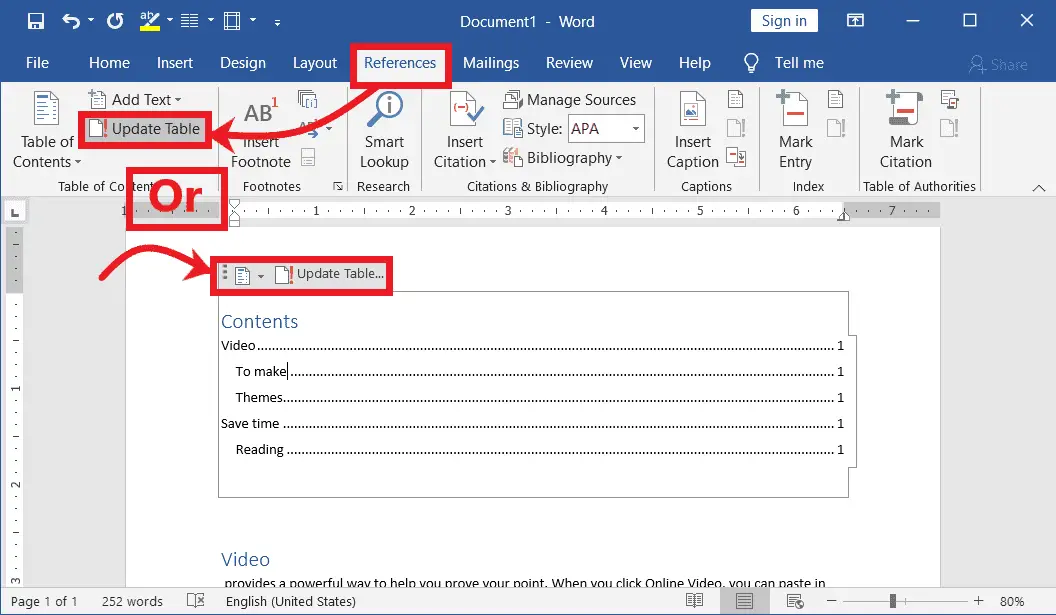
→ Then go to the References tab and click the table of content to expand its menu.
→ Now select Automatic Table 1 or Automatic Table 2 to insert it into your word document.
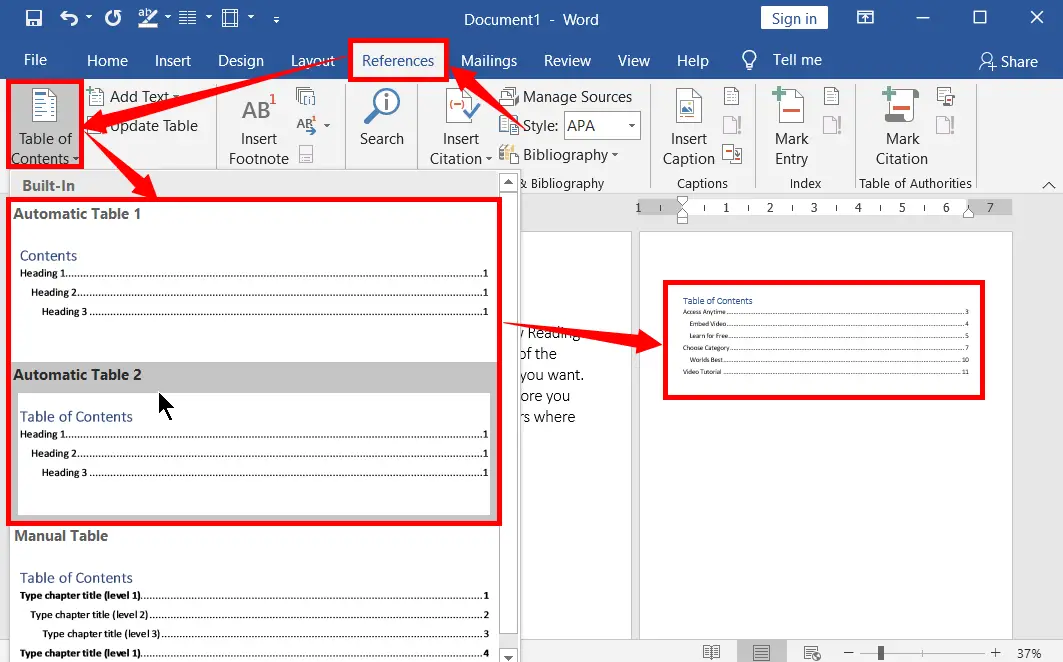
→ There is no difference between Automatic TOC 1 and Automatic TOC 2. The difference is that the heading in “Table of Content 1” shows the heading as “Content” only. And the heading of the “Table of Content” shows as “Table of Contents”.
Insert a Custom Table of Contents in Word:
Creating it manually in Word is a time-consuming process and has been used extensively. However, if we want to enter and format the content as we like, follow the steps given below.
→ To create a custom TOC, after preparing your word document, which may be a magazine, material, or any other book as described in the Automatic Table of Contents.
→ Again, Launch Navigation Pane, and show the paragraph marks (Press CTRL + *).
→ Similarly, format the heading levels as in the Automatic Table of Contents based on the heading level require for your document.
→ Put the cursor point by clicking in the beginning (pages 1,2,3 etc. based on requirement) of your document where it is required. (Follow the next steps below).
Launching the Custom TOC Dialogue Box
→ Go to the References tab and click the table of content to expand its menu.
→ Now select the Custom TOC in Microsoft Word to open its dialogue box. (Follow the next steps below).
Customizing:
After opening the custom Table of contents dialogue box, do the following.
Show or Hide Page Numbers:
To show or hide page numbers in it in a Word document, under “Print Preview”, tick or untick the “Show Page Numbers” option.
Right Align Page Numbers:
If you want to align the page numbers far or close to the right in the headings of the (index page) table of contents page, tick or untick the “Right Align Page Number” option, under Print Preview.
Tab Leader:
The tab leader option is useful to format the lines between the heading levels and the page numbers. In the Line formats, you can change different lines as well as show or hide them.
Use Hyperlinks Instead of Page Numbers:
In the document, you can use hyperlinks instead of page numbers. The use of page numbers and hyperlinks is the same.
Usually, hyperlinks are useful to navigate from one-page location to another.
But in the hyperlink option, you can’t see page numbers, instead, the heading in it appears in blue with an underline.
Hyperlinks are highly used in web page content to navigate from one page to another, or from one location of a page to another.
→ To navigate from TOC to any heading level in the document, press and hold down the Ctrl key and click on any heading you want in it.
Formats:
formatting a table of contents in a word document is easy. To format it, on the custom TO Cdialogue box, under general, select one of the formats you want by using the drop-down arrow of the format.
Show Levels:
You can easily select the number of heading levels you want to show on it. To do so, click the drop-down arrow of the show levels or enter the number manually that you like for the number of heading levels.
Updating:
After changing the heading levels in your word document, an update is required. To “Update Page Number Only” or “Update Entire Table”, Do one of the following:

→ Click on the TOC.
→ Soon update option will appear at the top right corner of it your word document.
→ If you choose “Update Page Number Only”, the page number will update.
→ If you choose “Update Entire Table”, the entire table will update.
(OR)
→ Go to the References tab
→ Click “Update Table” to open
→ If you choose “Update Page Number Only”, the page number will update.
→ If you choose “Update Entire Table”, the entire table will update.
How to Make a Manual Table of Contents in Word:
→ To create a manual TOC in MS Word, after opening your pre-prepared word document, which may be a magazine, material, or any other book as explained in the automatic table of contents and custom TOC.
→ There is no need to format the heading styles.
→ Go to the References tab and click the table of content to expand its menu.
→ Put the cursor point by clicking in the beginning (pages 1,2,3 etc. based on requirement) of your document where it is required.
→ Click the manual table of contents to insert in the word document.
→ Now click the heading level 1 to edit the fields in the table of content.
→ In the same way, do the remaining as in the above step. That’s it.
How to Insert Contents Page in Word | Insert TOC in Word
Note: After any above processes, you need to choose and insert the TOC page in word after formatting the heading levels.
To do so, place the cursor where you want to insert the contents page in word. And select an automatic, custom, or manual table of contents in a Microsoft Word Document.
How to Edit TOC in Word
After inserting it in Word, editing it in word is an easy process. To edit it, go to the heading levels of the document that you formatted earlier. After that, go to the and then update it.
Formatting TOC in MS-Word
After learning it, you can format it, by using the font formatting group on the home tab. Format only the heading in your TOC for a better look. If you format the entire heading levels of it, the formats will clear (except page number) when you “update the entire table” of the TOC.
How to Use:
It is used to analyse the contents type in one place in your document and also, used to navigate from its heading level to the content page, which is easy to read.
More from Office.com:
You can get more TOC templates in office.com by clicking more from Office.com or login to templates.office.com
Remove from Word:
If you want to remove it from your document, click the “Remove Table of Contents”.
What is the Table of Contents in Word?
The table of Content is the most important for every soft and hard copy material. It is based on the heading levels of the content in the document and can be added where necessary at any beginning of the same document.
What is the Shortcut Key to Create a Table of Contents in Word?
Press Alt → S → T, and then select one of the options you want.
How to link a table of contents to pages in Word?
After creating the TOC in your document, automatically it will be liked. There is no manual action is required to link.
How to format a table of contents in Word?
After making a table of contents select it, then go to the Home tab, and select the font formatting you want to format the contents of the table.