Data validation is the application of ensuring that the data entered in an Excel spreadsheet matches the parameters set for it. It is used to compare or confirm the data entered with current data.
If a user enters any restricted value into any cell of the pre-validated data, it will give a reminder-like message without accepting that value. Here, only unrestricted value can be accepted.
Table of Contents
Apply Data Validation to Range of Cells
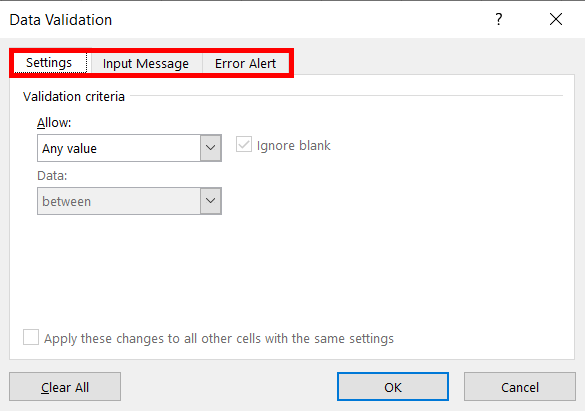
On the dialogue box, we have 3 options. They are 1. Settings, 2. Input Message, and Error Alert. These are all explained below the picture.
Apply validation to data
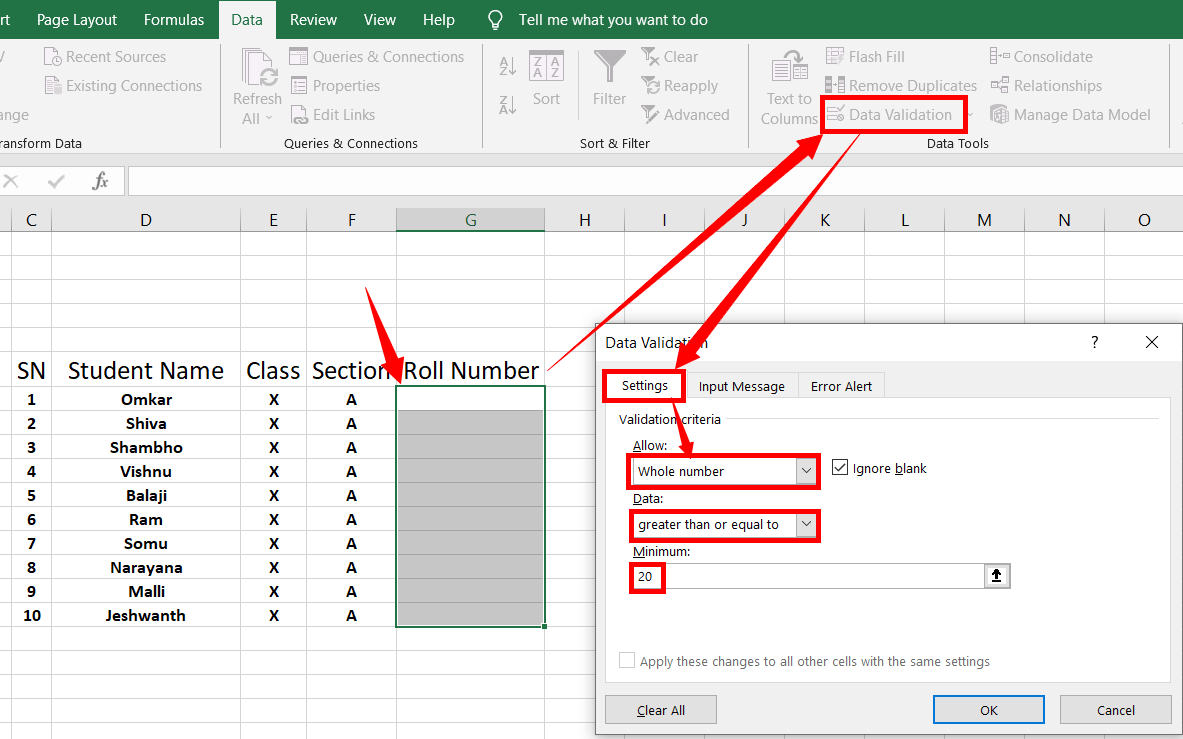
Select the range of cells to that you want to apply the rules
On the “Data tab”, click “Data validation” to open a dialogue box
On the “Settings” tab, under the “Allow” box, select “Whole number”
In the “Data” box, select any option you want to perform. In this case, I am selecting the first option called “Between”
Enter 20 as the greater than or equal value (Or select 20 as the greater than or equal value from a different range as in the picture above)
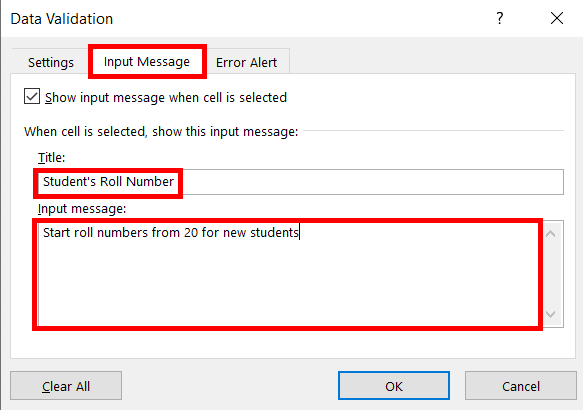
Now switch to the “Input Message” tab, and type title and message as the input message
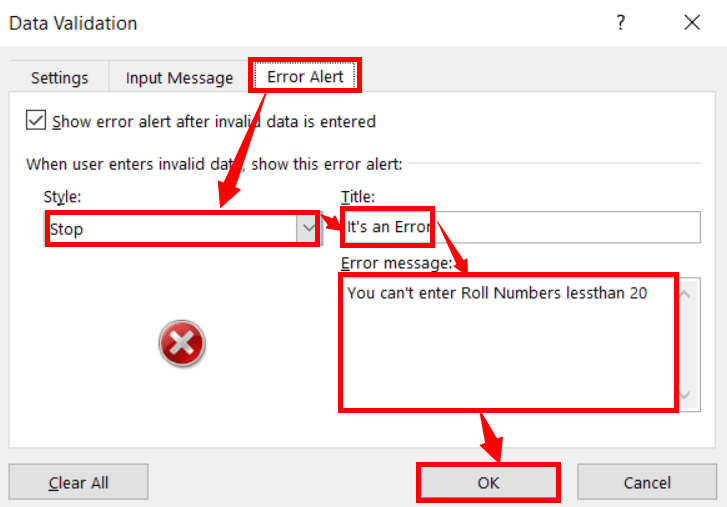
Again switch to the “Error Alert” tab, then select any error alert “Style”, and then type the title and message as “Error Alert”
Now if you select any cell that you have applied validation criteria, an “Input Message” will show as in the picture below
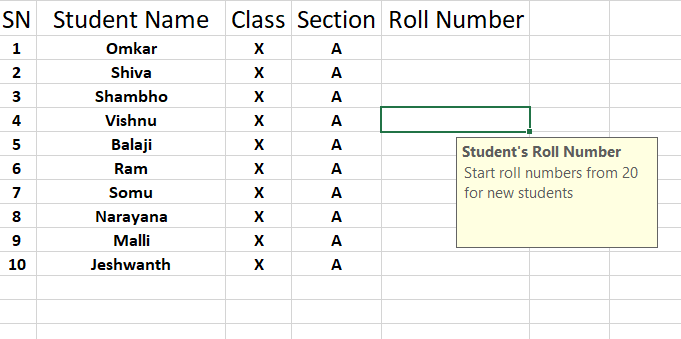
Now try to enter less than the minimum value of 20 as in the picture below, then, it will also show an “Error Alert” without accepting the values.

In the same way, try to enter greater than 20 values based on the given condition, and it accepts.
Allocation of all data authentication settings
Any value:
Any value is the first and default validation criterion and doesn’t apply any validation rules to the cells.
Whole number:
Once you have applied the rule to the range of cells, it allows only whole numbers with restrictions based on the given condition.
Applying restrictions to whole numbers:
Select the range of the cells to that you want to apply the rules
On the “Data tab”, click “Data validation” to open a dialogue box
On the “Settings” tab, under the “Allow” box, select “Whole number”
In the “Data” box, select any option you want to perform. In this case, I am selecting the first option called “Between”
Enter 20 as the minimum value and 25 as the maximum value (Or select 20 as the minimum decimal value and 25 as the maximum decimal value from other cells already filled)
Now set “Input Message” and “Error Alerts” (as explained in “Basics to data validation to a range of cells”)
Now try to enter less than the minimum decimal value of 20 and greater than the maximum value of 25, and then it will show an error warning without accepting the values.
In the same way, try to enter the numbers between the minimum and the maximum values (20, 21, 22, 23, 24, and 25) based on the given condition, it accepts.
Decimal:
Once you have applied the rule to the range of cells, it allows only decimal numbers with restrictions based on the given condition.
Applying restrictions to Decimal Numbers:
Select the range of the cells and open a dialogue box
On the “Settings” tab, under the “Allow” box, select “Whole number”
In the “Data” box, select any option you want to perform. In this case, I am selecting the first option called “Between”
Enter 0.1 as the minimum decimal value and 0.5 as the maximum decimal value (Or select 0.1 as the minimum decimal value and 0.5 as the maximum decimal value from other cells already filled)
Now set “Input Message” and “Error Alerts”
Now try to enter less than the minimum decimal value of 0.1 and greater than the maximum decimal value of 0.5, and then it will show an error warning without accepting the values.
In the same way, try to enter the decimal numbers between the minimum and the maximum values (0.1, 0.2, 0.3, 0.4, 0.5) based on the given condition, it accepts.
List:
Use the drop-down list to pick an item from a list of data that you create. Continue Reading >>
Date:
Once you have applied the rule to the range of cells, only data with restrictions based on the given condition are allowed.
Select the range of the cells and open a dialogue box
On the “Settings” tab, under the “Allow” box, select “Date”
In the “Data” box, select any option you want to perform. In this case, I am selecting the first option called “Between”
Enter 02/05/2020 as the start date (minimum) and 02/05/2021 as the end date (maximum). (Or select 02/05/2020 as the start date and 02/05/2021 as the end date from other cells already filled)
Now set “Input Message” and “Error Alerts”
Now try to enter less than 02/05/2020 as the start date (in ) and less than 02/05/2021 as the end date, then it will also be an error warning without accepting the date.
In the same way, try to enter the dates between the minimum and the maximum values (start date and end date) based on the given condition, and it accepts.
Time:
You can limit allowing the time format to the cells after applying the rule to the range of cells.
Select the range of the cells and open a dialogue box
On the “Settings” tab, under the “Allow” box, select “Date”
In the “Data” box, select any option you want to perform. In this case, I am selecting the first option called “Between”
Enter 9:30 as the start time (minimum) and 12:30 as the end time (maximum). (Or select 9:30 as the start time and 12:30 as the end time from other cells already filled)
Now set “Input Message” and “Error Alerts”
Now try to enter 9:30 as the start time (in ) and 12:30 as the end time, and then it will show an error warning without accepting the time.
In the same way, try to enter the time between the minimum and the maximum (start time and end time) based on the given condition, and it accepts.
Text Length:
You can limit allowing the number of characters or digits to the range of cells after applying this validation rule.
Select the range of the cells and open a dialogue box
On the “Settings” tab, under the “Allow” box, select “Whole number”
In the “Data” box, select any option you want to perform. In this case, I am selecting the first option called “Between”
Enter 2 as the minimum text length and 5 as the maximum text length (Or select 2 as the minimum text length and 5 as the maximum text length from other cells already filled)
Now set “Input Message” and “Error Alerts”
Now try to enter less than the text length and greater than the maximum text length, and then it will show an error warning without accepting the text length.
In the same way, try to enter the numbers between the minimum and the maximum text lengths (2, 3, 4, and 5) based on the given condition, it accepts.
Validation of custom data:
It is used for custom formulas. Continue Reading >>
Data Rules
Between:
The range of cells allows values that are only between two sets of numbers or letters.
For Example:
If you want to allow numbers between 20 and 25 to the cells you want, then the cells accept 20, 21, 22, 23, 24, and 25.
Not between:
The range of cells doesn’t accept the values that are between two sets of numbers or letters that you enter.
For Example:
If you don’t want to allow numbers between 20 and 25 to the cells you want, then the cells don’t accept 20, 21, 22, 23, 24, and 25. Other than these accepts all numbers.
Equal to:
The range of cells that accepts the values equal to the numbers or letters you entered.
For Example:
If you want to allow a number which is equal to 20, then the cells accept only 20.
Not equal to:
The range of cells that do not accept values equal to the numbers or letters you entered.
For Example:
If you don’t want to allow a number which is equal to 20, then the cells don’t accept the number 20. Other than the number 20 accepts all the numbers.
Greater than:
The range of cells that accepts the values that are greater than the numbers or letters that you enter.
For Example:
If you want to allow the number or letter which is greater than 2, then the cells accept greater than the number or the letter 2.
Less than:
The range of cells that accepts the values that are Less than the numbers or letters that you enter.
For Example:
If you want to allow a number or letter which is less than 2, then the cells accept less than the number or the letter 2.
Greater than or equal to:
The range of cells that accepts the values that are greater than or equal to the numbers or letters that you enter.
For Example:
If you want to allow the number or letter which is greater than or equal to 2, then the cells accept greater than or equal to the number or the letter 2.
Less than or equal to:
The range of cells that accepts the values that are Less than or equal to the numbers or letters that you enter.
For Example:
If you want to allow the number or letter which is less than or equal to 2, then the cells accept less than or equal to the number or the letter 2.
Other Controlling Tools:
Ignore blank cells:
When you enter a certain value to the blank cell beyond the condition you applied, it doesn’t accept those values besides an error alert message (if ignore blank cells option is ticked).
Input Message:
You can show a message to the selected cells you want. Click here to navigate how to set an input message
Error Alert:
Error Alert data validation shows an error alert message after you enter the invalid data into the cells. click here to navigate how to set an Error Alert.
What is Data Validation in Microsoft Excel?
It is the application of a required restriction to a cell or a range of cells that contain pre-validated data.
Can I control data types like numbers or dates?
Yes, data validation rules allow specific data types.
How do I set custom error messages?
Set custom error messages during data validation setup.
How do I remove data validation?
Select cells, go to “Data” > “Data Validation,” and choose “Clear All” or adjust settings.
Are there limitations to data validation?
Data validation has limits, may not catch all errors, and complex rules may require formulas.
Does data validation improve data quality and consistency?
Yes, it enhances data quality, reduces errors, and enforces consistency in Excel workbooks.