Microsoft Word, Excel, and PowerPoint now offer the capability to use the 3D models tools seamlessly into documents, spreadsheets, and presentations.
This is an online source. To insert 3D models, an internet connection is required. These models can be rotated like real objects and viewed from all angles.
In this article, we will explore the benefits of using 3D models in Word, Excel, and PowerPoint, provide step-by-step instructions on how to insert and manipulate 3D models.
Table of Contents
Benefits of Using 3D Models in Word, Excel, and PowerPoint
Enhancing visual impact
Using 3D models into your documents and presentations can significantly enhance their visual impact. Traditional flat graphics and charts often struggle to convey complex concepts or data points effectively.
However, with 3D models, you can bring ideas to life, providing a more engaging and immersive experience for your audience.
Whether it’s a detailed architectural design, a product prototype, or a scientific visualization, 3D models enable you to showcase intricate details and capture attention more effectively.
Improving data representation
When dealing with numerical data in Excel, it’s crucial to present it in a way that is both visually appealing and easy to understand.
By utilizing 3D models, you can transform dull spreadsheets into interactive data visualizations.
Instead of relying solely on tables and graphs, you can create dynamic 3D charts and graphs that allow users to explore data from different angles and perspectives.
This approach not only simplifies data interpretation but also adds an extra layer of interactivity and engagement.
How to Insert 3D models:
To insert do so, do one of the following:
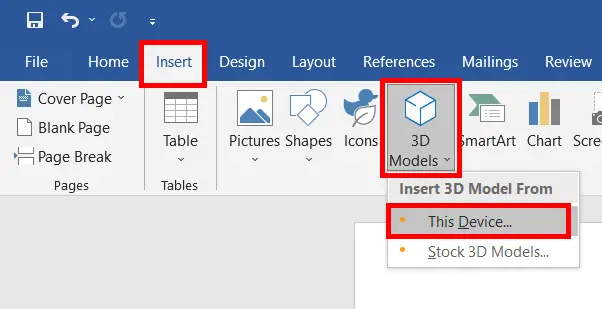
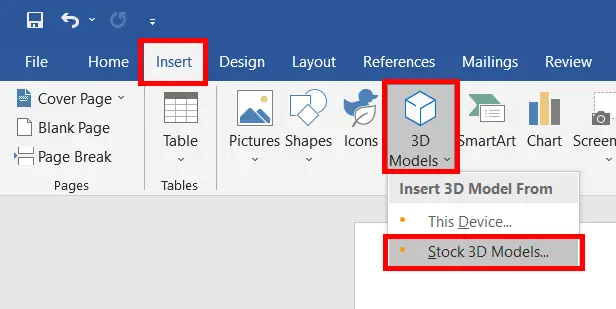
- Insert from Online Source:
- To insert 3d images from an online source, make sure your computer has an internet connection
- Then go to the Insert tab
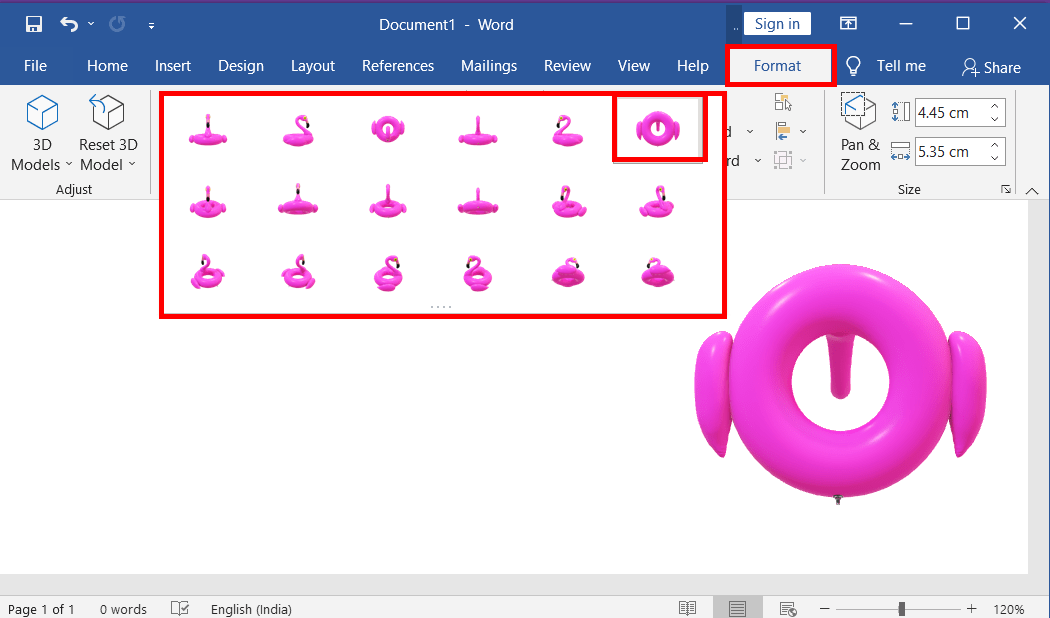
- Click on the 3D Models in the illustrations group, then click on one of the 3D model groups that you want to insert
- After that, select images as much as you want
- Lastly, click Insert to open the new 3D models’ tools format tab.
- From a Computer File:
- To insert 3d images from your computer, make sure your computer has an internet connection
- Then go to the Insert tab
- Click on the drop-down arrow of 3D Models in the illustrations group, then click “From a File”
- Search images in your computer that you have saved already
- After that, select images as much as you want
- Lastly, click insert to open a new 3D models tools format tab.
Opening a 3D model Tools Format tab in MS Word:
After inserting the 3d images as explained above, the 3D mode tools Format tab will open. Now get started to format the 3D images.
In the groups of the 3D Model Tools Format Tab in MS Word, the first group is Adjust. In the Adjust group, there are two commands to insert and reset the 3D images. These are as follows.
- 3D Models: It is used to insert 3D Models from various sources. This is also explained in “How to insert 3D Images”, which is given above.
- Reset 3D Model: Under this tool, we have two options i.e. Reset 3D Model and Reset 3D Model and Size. These are as follows.
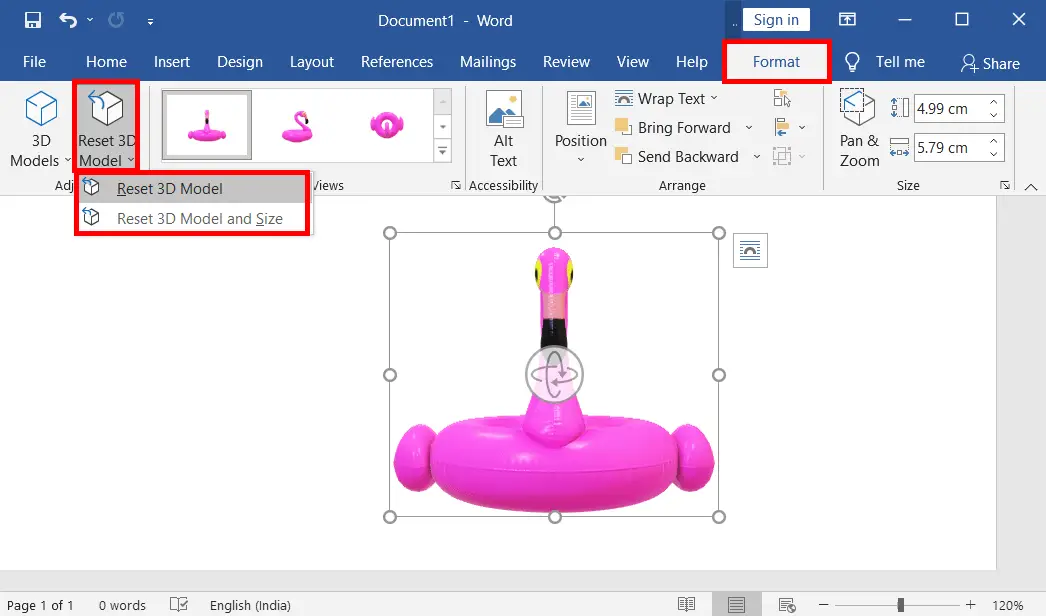
- Reset 3D Model: This tool is useful to reset a 3D image (not the size) to the default view that you have changed into any view.
- Reset 3D Model and Size: This tool is useful to reset a 3D image to the default view along with its size once you have applied any changes.
- 3D Model Views: View a 3D Image from different angles such as Top, Bottom, Back, Front, etc.
- Alt-Text: Create an alt text for objects such as shapes, pictures, 3D models etc. in Office products, which is useful for people with visual impairments. When you open and read any documents, they will hear the Alt Text you’ve already created.

Position: Change the position of the 3D Models in your Word document wherever you want. This option is especially useful when your document contains contents
Wrap Text: You can change the text wrapping around the object such as a 3D image.
Bring Forward and Send Backward: Bring Forward means to get the selected object on top of another object. Send Backward means sending a selected object behind the other object.
Selection Pane: Used to select, rename and reorder the objects you want.
Align: Change the placement left, and right top, etc. of the objects around the document.
Group: Link more objects together to position, align, zoom, and format as if they were a single object.
Pan & Zoom: Pan and Zoom focus on any main area of the 3D Models you want by zooming it.
After inserting the 3D models, click on the Pan and Zoom icon on the Format tab in the Size group.
As soon you click the Pan and Zoom option, a magnifier icon will be shown on the right side of the image.
Click on the magnifier icon and hold down the left mouse button then move up or down to zoom in or out.
Now you can rotate in any angle you want to focus any area by using a rotate icon, which is presented in the middle of the 3D Image.

Height and Width: Used to increase or decrease the height or width of a graphic.
Customizing and Manipulating 3D Models
After inserting a 3D model into your Word, Excel, or PowerPoint document, you have the flexibility to customize and manipulate it according to your needs. Here are some key options available:
- Adjusting position, rotation, and scale: Click and drag the rotation handle or sizing handles to change the orientation and size of the 3D model.
- Applying animations and transitions: In PowerPoint, you can apply pre-defined animations and transitions to your 3D models, bringing them to life during your presentation.
- Modifying materials and textures: Depending on the 3D model, you may have the option to change its materials and textures to suit your preferences or match your document’s visual style.
Remember to experiment and find the settings that best suit your desired outcome. Customizing 3D models allows you to create unique and impactful visual content that stands out from the crowd.
FAQ:
How may one integrate a 3D model into a Microsoft Word document?
Go to the “Insert” tab, wherein access the “3D Models” option.
What is a 3D Models Tool in Word?
The 3D Models Tool in Word allows you to insert and manipulate three-dimensional graphics and objects within your documents for enhanced visual communication.
Is the 3D Models Tool available in Excel?
No, the 3D Models Tool is not available in Excel. It is primarily a feature in Microsoft Word.
Can I export Word documents with 3D models to PDF or other formats?
Yes, you can export Word documents containing 3D models to various formats, including PDF, for sharing and distribution.
Are there any special system requirements to use 3D Models in Word?
Yes, you need a compatible graphics card and operating system to effectively use the 3D Models Tool in Word. Check Microsoft’s official documentation for specific requirements.